Singularity is a container solution fully OCI compliant specifically designed for HPC.
Images can be created as directories or as a single .img file, making it convenient to copy them around.
The single-file image can be made executable and treated as a regular executable (./my-singularity-container.img) with all dependencies self-contained.
Singularity executes the images directly without an intermediate daemon and uses SUID permissions on its executable. The privilege escalation is only used in parts of the code that really need it.
$ apt-get install gnupg tee wget

$ sudo wget -O- http://neuro.debian.net/lists/xenial.us-ca.full | \
       tee /etc/apt/sources.list.d/neurodebian.sources.list

$ sudo apt-key adv --recv-keys --keyserver \
       hkp://pool.sks-keyservers.net:80 0xA5D32F012649A5A9

$ sudo apt-get update

$ sudo apt-get install -y singularity-container debootstrap$ sudo yum -y update
$ sudo yum -y install wget epel-release
$ sudo yum -y install debootstrap singularityFor the case running a container getting an image directly from the syngularity container library
$ singularity run library://godlovedc/funny/lolcow

$ singularity run library://godlovedc/funny/lolcow

 _________________________________________
/ Conscience doth make cowards of us all. \
|                                         |
\ -- Shakespeare                          /
 -----------------------------------------
          \   ^__^
           \  (oo)\_______
              (__)\       )\/\
                  ||----w |
                  ||     ||
Or you can do the same thing running directly from the Docker hub
$ singularity run docker://godlovedc/lolcowWe are using containers from:
There are other places to find pre-build containers
First we recover a image to disk with the "pull" or "build" singularity commands.
Ex:
    $ singularity pull library://juanca/default/lolcow
    INFO:    Downloading library image
    1.4GiB / 1.4GiB [=========] 100 %
This container is saved as lolcow_latest.sif, "latest" is the Default Tag of the latest version.
You can run locally
    $ singularity run lolcow_latest.sif
     _______________________________________
    / A visit to a strange place will bring \
    \ fresh work.                           /
     ---------------------------------------
        \   ^__^
         \  (oo)\_______
            (__)\       )\/\
                ||----w |
                ||     ||
You can also execute commands as
$ singularity exec lolcow_latest.sif  date
Fri Aug 21 15:28:53 CEST 2020There are containers in lots of places. Singularity can convert and run containers in many different formats, including those built by Docker.
Here are some of the more popular ones:
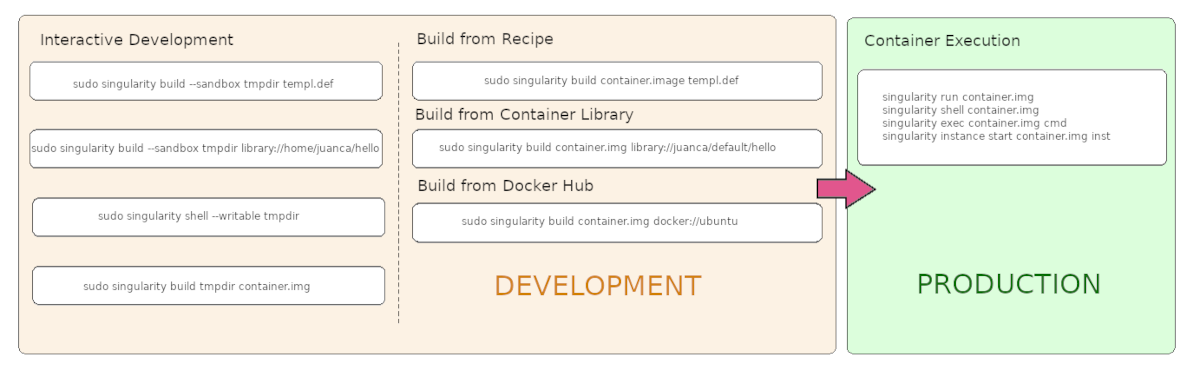
A build cycle
write a definition file
shell into the container with the --writable option and tinker with it interactively
record changes that we like in our definition file
rebuild the container from the definition file if we break it
fix and repeat until we are happy with the result
build the container from the final definition file as a read-only singularity image format (SIF) image for use in production
Optionally you could
push the container file in a repository
You need write a definition file
Ex: tp0.def
BootStrap: library
From: alpine:latest

%runscript
    echo "This is what happens when you run the container..."

%post
    echo "Hello from inside the container"
    apk  update
apk add vimThe Bootstrap keyword is always mandatory. It describes the bootstrap module to use.
Most people build containers from existing containers on the Container Library or on Docker Hub.
For instance, to use an existing Debian container from the Container library your header would look like this:
BootStrap: library
From: debian
The same thing but this time from a debian Docker Hub would be look like this.
Bootstrap: docker
From: debian
Use the debootstrap module to specify a base for a Debian-like container. You must also specify the OS version and a URI for the mirror you would like to use.
BootStrap: debootstrap
OSVersion: stable
MirrorURL: http://ftp.us.debian.org/debian/
The module yum allows you to build a Red Hat/CentOS/Scientific Linux style container from a mirror URI.
Bootstrap: yum
OSVersion: 7
MirrorURL: http://mirror.centos.org/centos-%{OSVERSION}/{OSVERSION}/os/$basearch/
Include: yum
See this list of “bootstrap agents” in the Singularity docs.
Building the tp0 sandbox
$ sudo singularity build --sandbox --force tp0 tp0.defGoto into the TP0 sandbox and check the new environment ex: pwd,os,hostname and user.
$ sudo singularity shell tp0

Singularity>

Singularity> pwd
/home/centos/TP

Singularity> cat /etc/os-release | grep NAME
NAME="Alpine Linux"
PRETTY_NAME="Alpine Linux v3.11"

Singularity> hostname -f
test-sym.cppm-cloud.in2p3.fr

Singularity> echo $USER
centos
Any modification to the image contained in the sandbox forces to open a shell using the --writable option. The shell command must be called from sudo.
$ sudo singularity shell --writable tp0
WARNING: Skipping mount /etc/localtime [binds]: /etc/localtime doesn't exist in container

Singularity> apk add figlet
(1/1) Installing figlet (2.2.5-r0)
Executing busybox-1.31.1-r9.trigger
OK: 36 MiB in 20 packages
As soon as you are sure of the changes to be made. You can edit the definition file.
%runscript
        fortune

%post
    echo "Hello from inside the container"
    apk update
    apk add vim fortune figlet

%environment
    export PATH=$PATH:/usr/games
    export LC_ALL=C
$ sudo singularity build --sandbox --force tp0 tp0.defAnd test, first the runscript record
$ singularity run tp1
No animal should ever jump on the dining room furniture unless
absolutely certain he can hold his own in conversation.
-- Fran LebowitzOnce you've verified your sandbox container, you can save a final image in Read Only Singularity Format (SIF).
The build command is always used from sudo.
$ sudo singularity build   tp0.sif  tp0
INFO:    Starting build...
INFO:    Creating SIF file...
INFO:    Build complete: tp1.sif

$ echo 'hello' |  singularity exec tp1.sif 'figlet'
 _          _ _
| |__   ___| | | ___
| '_ \ / _ \ | |/ _ \
| | | |  __/ | | (_) |
|_| |_|\___|_|_|\___/
The sandbox can be deleted
> $ sudo rm -rf tp0You can execute commands as
    $ singularity exec anaconda_latest.sif  date
Fri Aug 21 15:28:53 CEST 2020To run a interactive shell into
     $ singularity shell anaconda_latest.sif
    Singularity> id
uid=1001(carranza) gid=1001(carranza) groups=1001(carranza)This case is adapted when you run services into
    $ sudo singularity instance start --writable-tmpfs nginx.sif web
    INFO:    instance started successfully

    $ singularity instance list
    INSTANCE NAME    PID      IP   IMAGE
    web              1224          /home/centos/nginx.sif


    $ curl localhost
    <!DOCTYPE html>
    <html>
    <head>
    <title>Welcome to nginx!</title>
    ...
... $ singularity shell instance://my_anaconda
Singularity>Is possible to create and modify files on the host system from within the container.
Singularity bind or mounts several directories into your container by default. These include:
Other directories to bind can be specify using
the --bind option
the SINGULARITY_BINDPATH variable in the environment
Ex :
Supose we want to access a directory called locally '/data' from within our container. For this example, we first need to create this new directory with some data on our host system.
$ sudo mkdir /data

$ sudo chown $USER:$USER /data

$ fortune > /data/fortune.txt
List the contents of /data within the container without bind mounting /data on the host system to it.
$ singularity exec lolcow.sif ls -l /data
ls: cannot access '/data': No such file or directory
Using the --bind option a /data directory wil be created in the container and it will be bind mounted to the /data directory on the host system.
$ singularity exec --bind /data lolcow.sif ls -l /data
total 4
-rw-rw-r-- 1 centos centos 17 Mar 2 00:51 fortune.txtFrom the idea that the current directory is shared. All changes that affecting this path will be kept.
    $ singularity shell anaconda_latest.sif ls -l /data

    Singularity>

    Singularity> conda init bash
    ....
    Singularity> source ~/.bashrc

    (base) Singularity

    (base) Singularity> conda activate myenv

    (myenv) Singularity>

    (myenv) Singularity> conda info --envs
    conda environments:

    myenv                 *  /home/centos/.conda/envs/myenv
    base                     /opt/anaconda3
At this time you can install some things in your private space
``shell (myenv) Singularity>conda install matplotlib
(myenv) Singularity> python
Python 3.8.1 (default, Jan  8 2020, 22:29:32)
[GCC 7.3.0] :: Anaconda, Inc. on linux
Type "help", "copyright", "credits" or "license" for more information.

>>> import matplotlib as np
Leave now the instance and stop it
``shell
(myenv) Singularity> exit
$ singularity instance stop my_anaconda
INFO: Stopping my_anaconda instance of share/local/singularity/Anaconda_2020.02.simg (PID=165453)Even after we exited the container, the conda environment will be present. All changes that you have done will be preserved.
``shell $ ls .conda/envs myenv
``` ### Singularity and Openstack playing together
Separating roles can be the best strategie to profit from containers and cloud tecnology. Let the Openstack cloud infrastructure take the role of resource provider and use the "singularity" software the role of provisioning the software.
First create une openstack instance and install singularity software into.
$ openstack server create --flavor m1.large
    --image  CentOS-8-x86_64 --nic net-id=$OS_NET
    --security-group default --key-name your-key
    --user-data anaconda.txt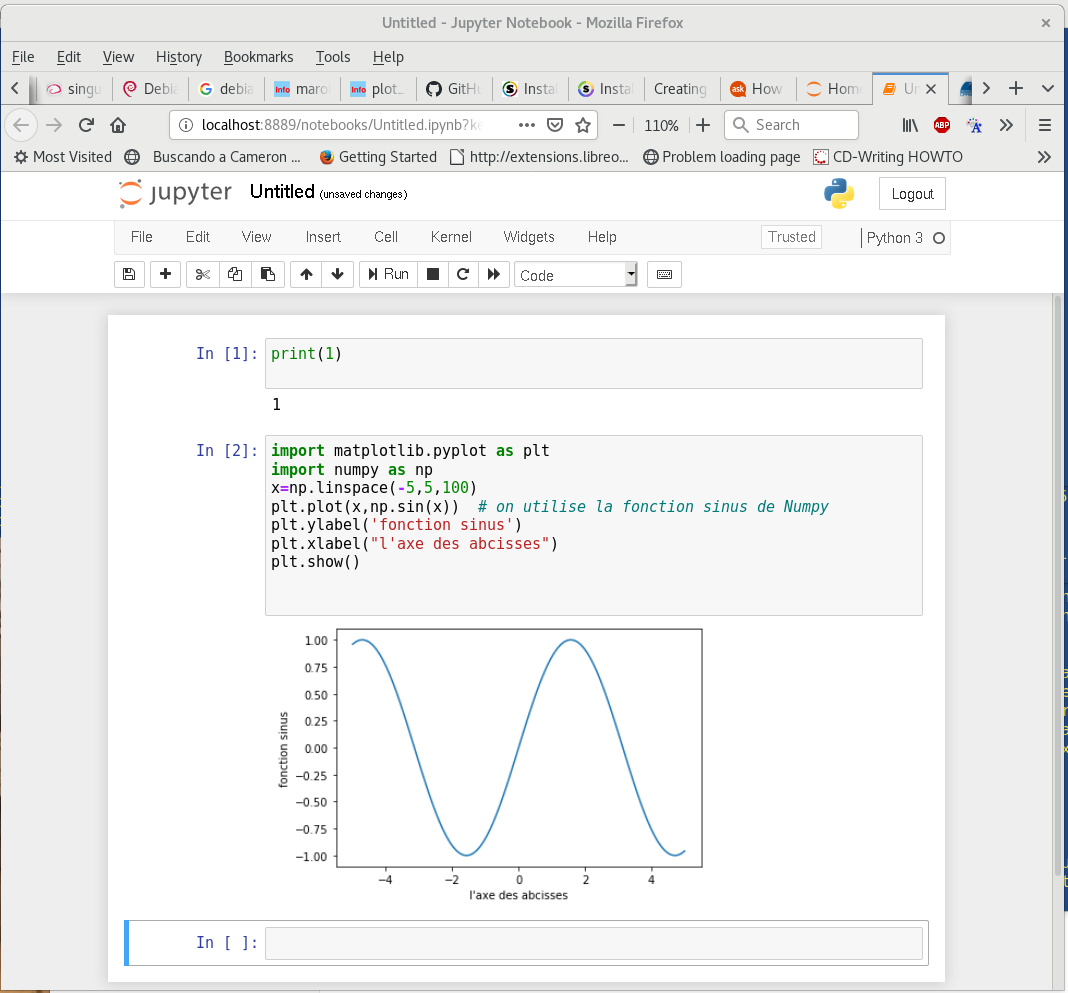
your_instanceThis should start a jupyter notebook server the server and give you an html address with a security token to use for the connection.
    $ singularity exec --bind /tmp:/run/user
        anaconda_latest.sif  jupyter notebook
Running Singularity in a openstack instance needs to do some network configuration to make things work properly. You probably need to set up an ssh tunnel in a new terminal to access the notebook server.
$ ssh -i your_priv_key -N -L 8889:localhost:8888 centos@your_instanceAfter that, you can connect to the given html address but using localhost or 127.0.0.1 and the redirected port
Links |
---------------------------------------------------------------------- |
Singularity| |
The user Guide |
Examples |
Videos |
----------------------------------------------------------------------------------------------- |
Building Singularity Containers From Recipes |
Containers for Science, Reproducibility, and HPC |
Singularity - Container Workflows for Compute. |